- Introduction to the R Interface
- Setting up a project in RStudio
- Setting up a working directory in RStudio
Setup R-Studio
Introduction to the R Interface

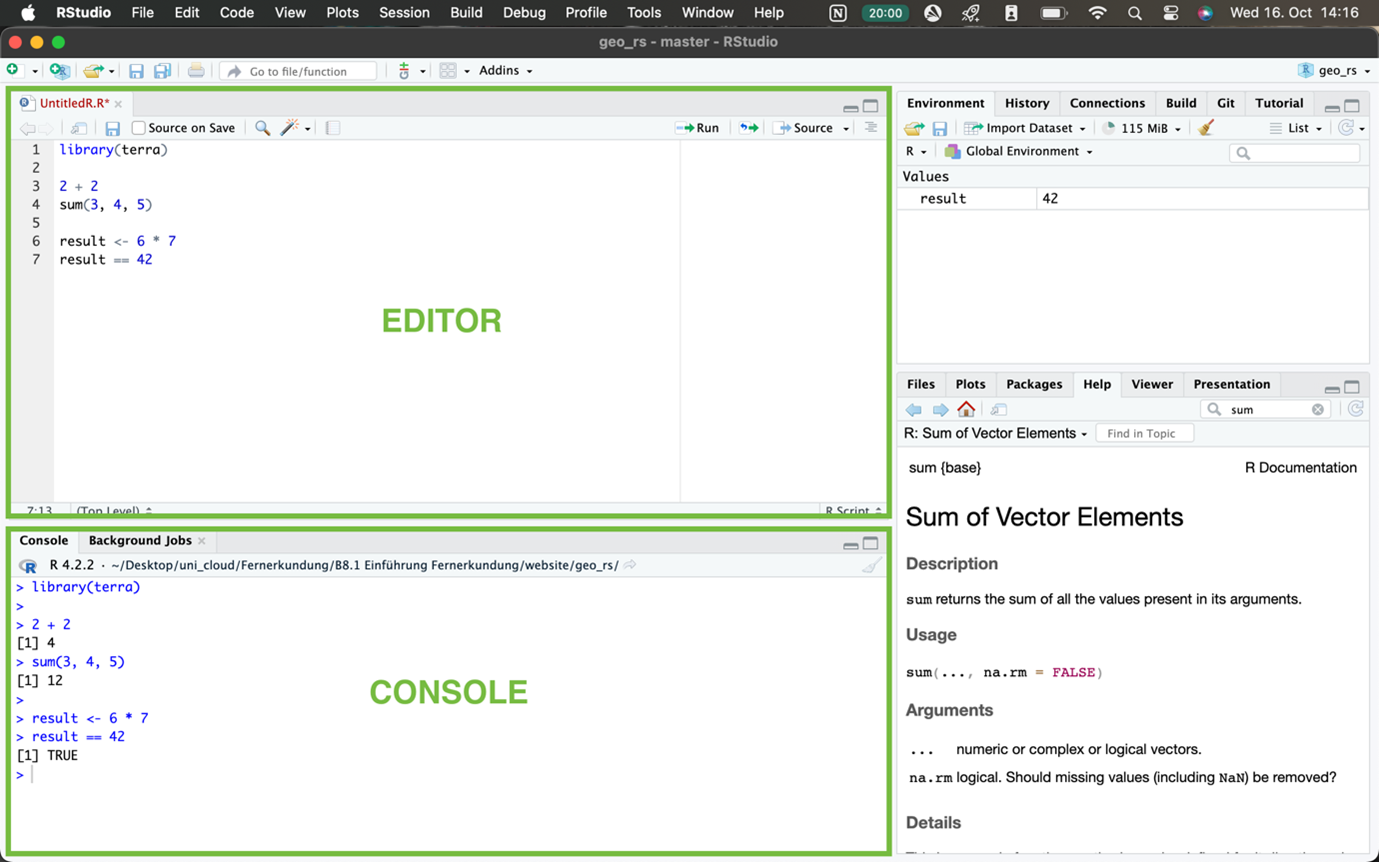
The Editor is your workspace and where the code you are working on is staying when you save your project. It is your place of input. The Console is giving you results of executions you request, the output. Usually, you execute code from the Editor by choosing one or several lines and press Ctrl + Enter or Cmd + Enter. The result will appear in the console. You can also directly type code in the Console and just hit Enter. Just be aware that once you close the program this code exclusively written out in the Console will be gone.
Besides that, there is by default on the right-hand side two more windows. On top you will find different ways to manage your data. The bottom panel has several tabs of which ‘Help’ can be of interest as a beginner. We will explore their features further in the next sessions.
You are able to collapse the separate the windows. If you accidentally altered the view and missing one you can find in the top bar ‘View’ > ‘Panes’ > ‘Show All Panes’.
Personal recommendation: If you like to personalize your R Studio as it makes working with it sometimes way more fun, go to the top choose ‘Edit’ > ‘Settings’ > ‘Appearance’ and choose a theme that excites you.
Setting up a project in RStudio
We recommend to create an RStudio project for all the work you do for
this module. This helps you keep your data and scripts (.R-
or .Rmd-files) organised.
In order to set up a new project in Rstudio:
- Navigate to the tab “File” and select “New Project”
- Either select “New Directory” if you do not have a folder for this module yet, or select “Existing Directory” to point towards to such an existing folder. If (1): “New Directory” > “New Project”, select a name and a location to store the folder in, and finish by “Create Project”.
- Navigate to the path of the project folder on your machine
- Inside the folder, create the following sub-folders: data, scripts, models, results, and figures
- All scripts for each session are ideally saved into separate
.R- or.Rmd-files and saved in your “scripts” folder - You can use this blueprint .Rmd for your work
If you close and reopen RStudio, the last project should be reloaded automatically. If not the case, just navigate to the tab “File” and select “Open Project”.
Setting up a working directory in RStudio
Over the next sessions you will learn first-hand how important data management is. As we will work with raster data and also create our own, it is important to keep them sorted in one place. This is made easy by setting the folder in which your newly created data will be stored as your working directory.
For Windows remember that R uses forward slash (/) instead of the usually present backward slash () in Windows path names.
Example for Windows: setwd(“C:/User/Desktop/Fernerkundung/Seminar/Session1”)
Example for Mac: setwd(“/Users/Julia /Desktop /Fernerkundung/Seminar/Session1“)
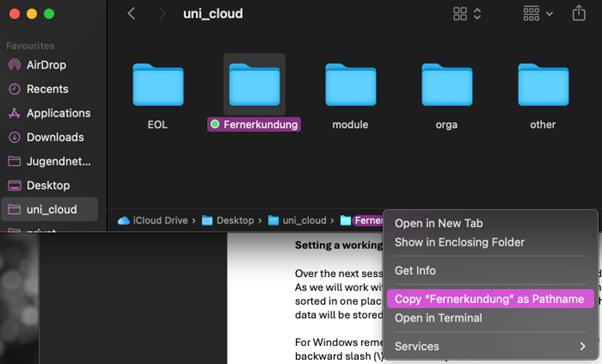
Tipp for convenience: Windows: To copy the full path of a file or folder, hold Shift and right-click the file or folder, then select “Copy as Path” from the context menu Mac: When browsing the Finder in the bottom bar of the window you can “Copy as Pathname” instead of having to type it out.

If we want to save for example a newly created raster image, we can type out the following and it will automatically be saved in the folder we set as our working directory previously.
writeRaster(name, “chosen_filename.tif”, overwrite=T)
Copyright © 2023 Humboldt-Universität zu Berlin. Department of Geography.